
Disbursement
Use Disbursement to prepare and record reimbursements after expenses meet the required conditions.
Configure disbursement policy
- Open Disbursement > Settings.
- Select the company's settlement currency.
- Choose whether payout accounts must be verified.
- Enable separate creators and approvers if your company requires that control.
- Choose whether expenses without approval can be processed.
- Save the settings.
If document handling for payouts is not ready, contact your administrator.
Expense eligibility
An expense generally must:
- be Posted, not void or archived;
- be approved or identified as not requiring approval under company policy;
- use an employee-funded payment method;
- have an amount greater than zero that can be converted into the settlement currency;
- belong to a user with a payout account that meets company requirements;
- not already be in another active disbursement batch;
- have its possible duplicate review resolved.
Open the Eligible tab to see expenses that are ready. Expenses already linked to a disbursement with a Draft, Queued, Processing, Paid, Failed, or Reversed status are not shown. Expenses from a cancelled disbursement can appear again for reprocessing.
Reconcile an expense funding source
An older expense may have an out-of-sync funding source even though its payment method is employee-funded. The expense displays a Reconcile action in the Eligibility section.
To reconcile one expense:
- Select Reconcile on the expense to update.
- Wait until the icon stops spinning and the list refreshes.
To reconcile multiple expenses at once:
- Select the expenses to update.
- Select Bulk reconcile. The number on the button shows how many expenses will be processed.
- If no expenses are selected, every reconcilable expense on the current page is processed.
- Wait for the operation to finish before refreshing or leaving the page.
Reconciliation only synchronizes the expense funding source. It does not create a batch or record a payment.
Prepare payout accounts
- Open Payout accounts.
- Select a user and open the account details.
- Check the account holder, bank, and account information.
- Verify the account when it is correct, or reject it when it is not.
- Deactivate accounts that are no longer used.
Changes to important account information may return the account to pending verification.
An authorized Disbursement user can verify any account with Pending Verification status, including an account they submitted themselves. The verifier and verification time remain recorded. A submitter cannot reject their own account.
Create and submit a batch
- Open the Eligible tab.
- Select the expenses to pay.
- Select Create Batch.
- Check the user and account grouping.
- Set the settlement date.
- Save the batch as a draft.
- Open Batches, check the total, then select Submit.
When separation of duties is enabled, a batch creator cannot approve their own batch.
Before processing starts, a Draft, Submitted, or Approved batch can be returned to Eligible with Unbatch:
- Select Unbatch from the batch list or batch details.
- Review the warning that the action cannot be undone.
- Enter the required reason.
- Confirm the action.
The batch becomes Cancelled, and its expenses can appear in Eligible again if they still satisfy the eligibility rules. Batch details retain who performed the Unbatch, when it occurred, and the reason. The reason is also visible in the related payout history.
Complete a disbursement
The batch details show the recipient, masked payout account, expense allocation, transfer amount, and actions for recording the payment result.
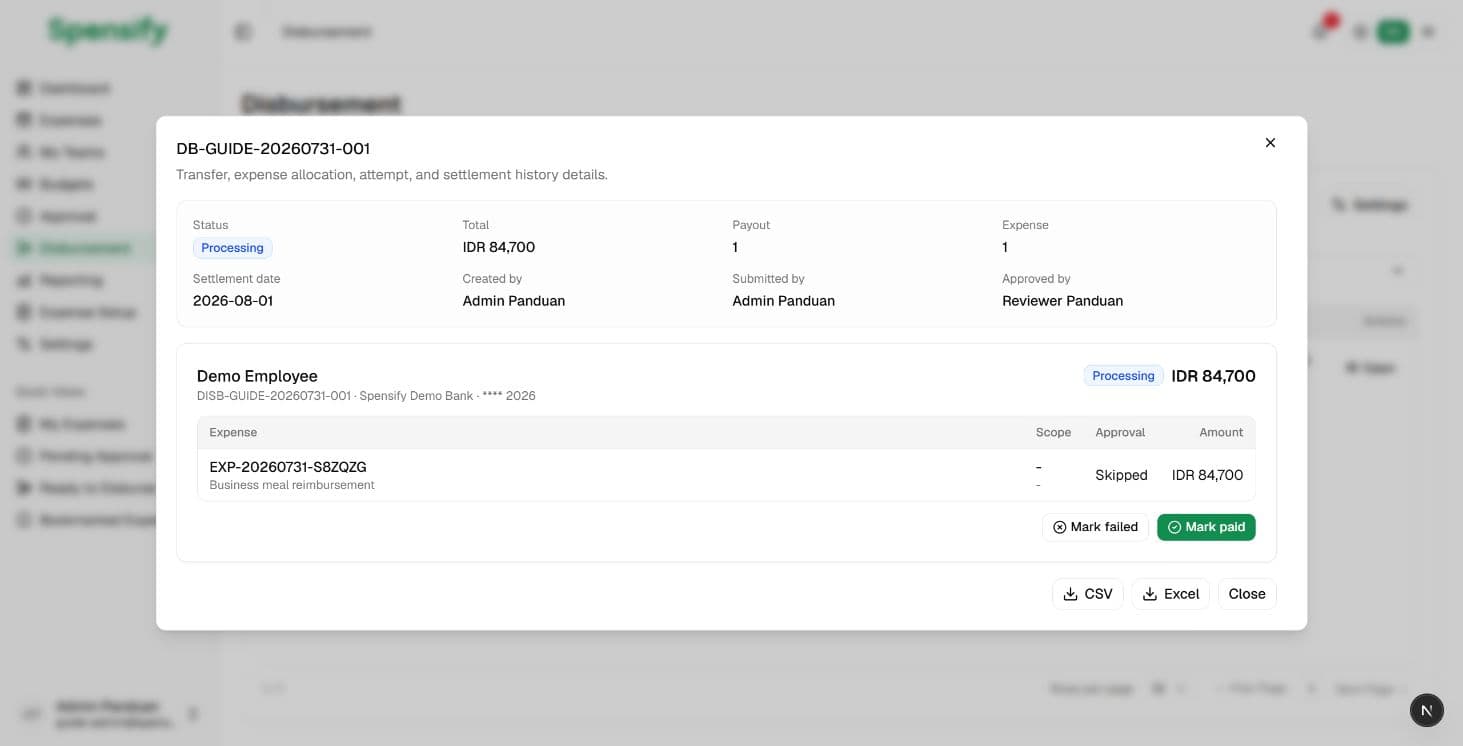
- An approver opens the submitted batch and selects Approve.
- Download CSV or Excel if a payment file is needed.
- After payment, mark each payout as Paid or Failed.
- To mark a payout as Paid, enter the settlement reference and settlement time, then attach payment proof when required.
- Enter a failure reason when marking a payout as Failed.
Manual settlement requires payment proof. Supported files are PDF, JPG, JPEG, and PNG up to 10 MB. Payment-provider mode allows the proof to be optional. Uploaded proof is available from the payout details after settlement.
Unbatch is no longer available after a batch enters Processing. Check the current batch and recipient status before continuing.
Main statuses
- Draft: still being prepared.
- Submitted: waiting for review or approval.
- Approved: ready for payment processing.
- Processing: payout processing has started and the batch can no longer be unbatched.
- Completed: every payout in the batch has been completed.
- Partially Failed: the batch contains both successful and failed payouts.
- Paid: payment was recorded as successful.
- Failed: payment was unsuccessful and requires follow-up.
- Cancelled: the batch was unbatched or the payment was cancelled.
For the complete change summary, see Latest Disbursement Update.
Next
Continue to Reporting.